Saturday, January 12, 2013

Homemade Wipes: Baby, Glass and Cleaning

 Homemade Baby, Glass and Cleaning Wipes

I can't claim this idea, though many of my friends think I came up with it.  We Schuylers are penny-pinchers and some people make these to save money... but that isn't why I started.  See Josh is VERY particular about ingredients and has been for some time now.  Its funny how I use to be annoyed by it and now I see it everywhere; no MSG, no aspartame, no parabens, no high fructose corn syrup, no vaccines (no mercury), no microwaved popcorn, no BPA, no plastic, ever, in the microwave... actually don't use the microwave at all, no tuna in a can (again with the mercury), no a-million-other things and it isn't cheap to live this way.  All the "junk" is cheap!  Anyway when it came to baby wipes the 99 cent store even carries though, but the ingredients were not acceptable.  What to do?  Super expensive baby wipes?  Ridiculous. And so the adoption of making our own wipes came to be.  This way we know exactly what is in them.  It didn't stop there though.  Eventually Lycol hit the "no no" list for apparently including agent-orange in its ingredients (obviously named something else)... and so the same principle was applied to cleaning wipes and recently to glass wipes as well.

Here is what I do (you are sure to find a million other recipes if you google the idea or look it up on pinterest!)

Baby Wipes:


*3 capfuls of oil (I use baby or mineral)
*3 squirts of baby wash (this is where our "expensive" baby wash came in.  I usually use California Baby or Berts Bees but used Aveeno this time.  This is the most expensive thing but one bottle will last a long time)
*BOUNTY select-a-size paper towels.  Trust me on this I have tried Viva (they dont seperate well and act like a memory foam when wet) Brauny, and generic. Bounty is worth it- but feel free to experiment and let me know if you find another that works (Scott, Kirkland, Sparkle etc.)  The good thing about the select-a-size is that the wipes end up being more square and easier to manipulate.
*Container with a lid (got all mine at the 99 cent store and they dont have to be round I have square ones too)
*A sharp, non-serrated knife.  I also got this at the 99 cent store because they dull quickly when constantly cutting cotton.  I buy a big pack of paper towels and employ my dear husband to cut them in half for me so they are ready to go.

Step One: Cut Paper towel in half
 Step Two: Add 3 squirts (TB) of baby soap and 3 capfuls of oil to your containter
 Step Three: Add 2 cups of water and mix it around (I just use my fingers)
 Step Four:put your 1/2 paper towel in with the "ugly" side up first, for about 5 seconds
 Step Five:Then pull it out and turn it around and replace
Step Six: Cover and wait approx 5 minutes for entire roll to be moist
Step Seven: Label it- especially if you are like me and make more than one kind of wipe.   I suggest labeling the actual container, not the lid as those can easily get mixed up.
Step Eight: When ready to use remove the center of the paper towel... it comes out nice and easy and the paper towel roll starts to unravel from the center and continue much like tissue paper.  Perfect!

Cleaning Wipes:

*1 Cup cleaner (I use simple green, but anything will suffice)
*1 Cup water
*BOUNTY select-a-size paper towels.  Trust me on this I have tried Viva (they dont seperate well and act like a memory foam when wet) Brauny, and generic. Bounty is worth it- but feel free to experiment and let me know if you find another that works (Scott, Kirkland, Sparkle etc.)  The good thing about the select-a-size is that the wipes end up being more square and easier to manipulate.
*Container with a lid (got all mine at the 99 cent store and they dont have to be round I have square ones too)
*A sharp, non-serrated knife.  I also got this at the 99 cent store because they dull quickly when constantly cutting cotton.  I buy a big pack of paper towels and employ my dear husband to cut them in half for me so they are ready to go.


Glass Wipes:

*1/4 cup Vinegar
*1/2 Tsp Liquid dish soap
* 2 cups water

(or substitute all that for 2 cups Windex.. which I sometimes do as well)

*BOUNTY select-a-size paper towels.  Trust me on this I have tried Viva (they dont seperate well and act like a memory foam when wet) Brauny, and generic. Bounty is worth it- but feel free to experiment and let me know if you find another that works (Scott, Kirkland, Sparkle etc.)  The good thing about the select-a-size is that the wipes end up being more square and easier to manipulate.
*Container with a lid (got all mine at the 99 cent store and they dont have to be round I have square ones too)
*A sharp, non-serrated knife.  I also got this at the 99 cent store because they dull quickly when constantly cutting cotton.  I buy a big pack of paper towels and employ my dear husband to cut them in half for me so they are ready to go.


Towel Cake Gift


 How I made this Towel Cake- and why!

I can't believe its been 7 months since my little brother got married.  I am and was so excited for him and love his wife Rachel!  It was about a month before their wedding that I made this gift for them.  I have made many diaper cakes before for baby showers and have even made a few towel cakes for bridal showers in the past but this time I decided to photograph my way through it.  Usually a towel cake would consist of 3 layers: 2 Bath towels or Bath sheets for the bottom, 2 hand towels for the center and 2 face wash cloth towels for the top.  I decided that my brother and his wife needed a rug more than face towels so switched things up a bit.  

Here is what I used:
Glue Gun, coordinating color ribbon, clear cellophane bag, but I just used a clear trash bag, I also used some velcro tabs, a rubber band and scissors not pictured

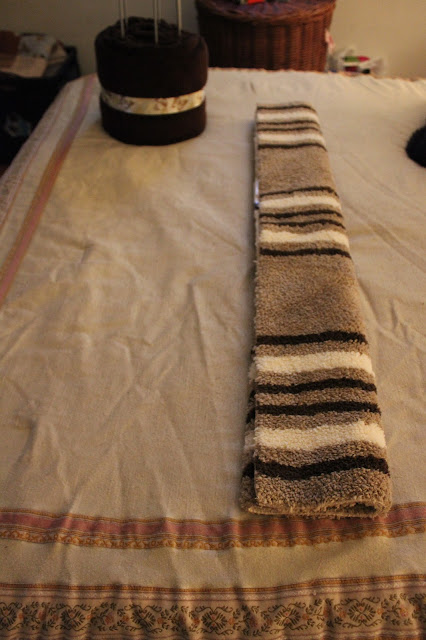
 A toilet paper roll holder (as my functional and structural center), 2 bath towels, 1 rug and 2 hand towels

Here is what I did:
Starting with the bath towels I folded one lengthwise in half twice and the started rolling it into the center of the toilet paper roll with the double seam down and the clean 1 seam facing the top.


 The first towel folded neatly into the toilet paper holder after the factory tag (I figured when they took it apart it would be nice to see that and know they are new and all that).  I Then simply continued with the second bath towel (this time tag side in) as if the two towels were connected.  

When complete I wrapped a large piece of ribbon around the center and connected the ends with velcro.  I could have used hot glue or even tied a bow but I wanted a really clean look..  Bottom level DONE


 Onto Level 2 of the towel cake: The Rug.  I again folded it lengthwise but the keep with the height of the bath towel level only folded the rug into 3rds.


 Again I rolled it into the center with the clean seam facing upward and inward....


This layer didn't stay well on its own so i tucked in back into the toilet paper holder and plan to use the "valley" seam as the rear of the completed and displayed "cake".  I repeated the ribbon and velcro on this level as with the bottom level. Middle layer DONE


Now to the top layer.  Also had to do these in thirds to keep with the heights of the bath and rug layers... See how I just line the towels up end to end, no connecting them or anything, just keep rolling as if they are one looong towel.


 Top layer DONE... but total project?  Almost.


I then wrapped it with plastic and held it tight with a rubber band at the top, then flattened out the extra plastic ontop.


With the rest of the ribbon I made my own coordinating bow/flower.  3 long even strips and one shorter strip as shown.   


Fold the longer pieces into the center keeping the "pretty" side up.   (the one on the left shows a partially done "petal".  The one on the far right is the small piece glued in a circle for the center.


 Assemble is the 3 long pieces centers touching each other and the circle piece in the middle.  Your own homemade bow! 


 And now it is ready to present to the recipient!  I love making these for bridal showers so if I come to yours- act surprised!  (I check registrys first to make sure you need towels and to get the kinds you like!).  After 10 years of marriage, 2 kids and 1 on the way I am not likely to know many single people that are doing traditional weddings and bridal showers anymore (more likely to go to a baby shower) but hey... when I can I do.


Thursday, May 10, 2012

Spinach Cheese Bake and How to Thaw Spinach FAST

Its been too long since I have posted, and I want to do better, especially now that I am looking great stuff up on Pinterest.  I love finding "tips and tricks" to improve life, recycle crap I have too much of and great craft ideas and recipes.  One that I couldn't find but use often I had to add here, so that I can pin to my own blog and be able to find the recipe again and again since I am always searching thru my computer for it is Spinach Cheese Bake.  

A few years back Josh went on the "No Grain Diet" and so I had to experiment with what we had to make something besides meat all the time, or at least something to go WITH the meat.  I used a great app called "big oven" where you put in 3 ingredients that you have on hand and it comes back with a few recipes that include those items.  Some great recipes have come out of "yogurt, cilantro and chicken" search and this one was a modification of a few recipes I came across when searching for "spinach, cottage cheese and eggs".  


No Grain Spinach Cheese Bake

1 lb (16 oz) cottage cheese (I use small curd)
3 eggs
1c grated cheddar cheese
3T butter, cut into bits
1 Pk frozen spinach, thawed, drained and squeezed dry (see note if you have frozen spinach and want to know a fast way to thaw it)
3T Almond Meal (you could use flour but since we went "no grain" we use almond meal instead of flour and its such a little in the recipe no one we have made it for even notices
Salt to taste


What to do:
1. In large bowl (I use a measuring pyrex bowl and measure out my cottage cheese this way so as to have less dishes) measure out cottage cheese

 2 .Add eggs, I have taken many :cooks" advice and always have a "trash" bowl on my counter.  So far in my trash bowl is the cottage cheese plastic lid and the egg shells.  I had to this anything that is trash and empty it when its full... saves me running back and forth to the trash can!  This is one the th best ideas I have ever adopted while cooking!

 3.  Cut up your butter into bits and add into cheese/egg mix and mix it all together (I use a fork which helps break up the egg and mix the spinach in later)

4. Add in the 3 TBS almond meal, flour, breadcrumbs or whatever flour substitute you can think of.  I use almond meal as we are trying to stay grain free.
5. Add in squeezed out spinach.  Mix with a fork. (see below for what to do if you have frozen spinach at this point and need to thaw it fast.  I often forget to "prepare" and thaw anything in time)
 
6. Spray a square glass baking dish with an olive oil spray or coat with butter/pam whatever and add spinach/cheese mix.  Note: This is kind of like brownies in the sense that you can cook it in a larger container if you want it to come out in thinner squares or a smaller dish for thicker servings.
Bake at 350° for 45-60 Min. 
7. When it is done (browned) and a bit cooler I cut it into squares and add a squirt of lemon juice and some salt to taste.


How to thaw Spinach fast 

I use frozen spinach and am a busy mom so almost always forget to defrost it "properly" so this is what I do if I forget and need it defrosted quickly:

1.  Fill a saucepan with cool water and put in a colander of nearly the same size.

2. Place frozen spinach in colander (which will be submerging the spinach in the water)

3. Squish around the frozen spinach every few minutes until there are no chunks, then lift up the colander, dump the water from the saucepan and put the colander back in to "drain the spinach"


5.  Push down on the spinach draining all water possible into saucepan (i use a potato masher most of the time).


Monday, October 31, 2011

Tanaka Farms & The Great Park: School Field Trip

Savannahs Preschool went on a field trip to Tanaka Farms. Its kind of a tradition to go every season as they have several different tours: Watermelon Tour, Strawberry tour, Pumpkin Patch Tour and Christmas Tree tour, each of which include picking a recently grown item. This Pumpkin tour included a cart ride out to the fields. A petting zoo. The picking of vegtables: radishes, carrots, green beans and onions. There was a corn maze, a hay maze and a pumpkin patch. Pumpkin rule: you gotta be able to carry out the one you pick- kids included. This wasn't a problem for Savannah as she was set on getting a "Savannah-sized" pumpkin to go with the "mommy" pumpkin that was at home. Here on some pics from the day.

When we first got there Savannah couldn't friend her friend Kira... so she forced a smile for the Camera.

Aw and Kira was found.  They held hands for a long time.

Here are some of the kids from the school.  The preschool she is in has a 2 day class a 3 day class and a 4 day class.  Savannah is in 2 day.  This was an all school field trip so some of the kids aren't in her actual class.

Savannah and Kira chatting it up as up parents try to snap a couple good ones of most of the kids looking our way!


Aww- she has grown almost an inch since last month.  We started charting at home so she would have more of a visual motivator to eat her veggies- its been working- and shes been growing!

Sweet little Charlotte just hanging out in the stroller.  She wasn't too happy about missing a nap and made sure everybody knew it- but you could never tell from this pic of a "happy" moment.  Just love this pic!

Savannah in the hay maze.

The Pumpkin Savannah picked. 

This is the "Great Park" in Irvine.  Why have I never heard of this place?  The Carousel was/is FREE and so was a ride int hat giant Orange balloon- which they dressed up like a pumpkin for the month of October.  So cool!!

This little boys name is Griffin.  He was, coincidentally, in the same swim class as Savannah not long ago, and now he is in her class and seems to like her!

The view from the top- check out our balloon shadow!!  This park is built upon an old military airfield base that has been closed for years... its still growing and its pretty enormous!
Savannah rode the kitty twice along with the zebra and the tiger.  Poor Savannah she was so sad to get off it.  She was allowed to ride as many times as she wanted but was too short to ride without me, which meant I had to drag Charlotte along too.  The first few times I just held Charlotte in my arms, then I actually strapped her onto a horse and held her that way.  She seemed to love it.  But 4 times was just too much for her and I.  After that I was just done, and SICK.  Someone tell me a good brand of those balance bracelets because I need one!  I get so easily motion sick these days, yuck.  Charlotte got sick after too and actually threw up a bit, poor thing.  Savannnahs love and concern for Charlotte trumped her desire to get back on the carousel so we were able to go home!  Phew. Here she is riding the zebra!

Both girls feel asleep in the car on the way home- aw the peace of a quiet drive!